2025-03-28
Spring 의존성 주입
Spring Framework (2)

Spring 의존성 주입
interface AnimalType {
    ...
}

class Dog implements AnimalType {
    ...
}

class PetOwner{
    private AnimalType animal;

    public PetOwner() {
    	this.animal = new Dog();
    }
}
이러한 경우 PetOwner는 AnimalType에 의존하게 된다.
하지만 이러한 구조에는 문제가 있는데 다음과 같다.
따라서 AnimalType 객체의 변경은 PetOwner의 변경을 야기한다
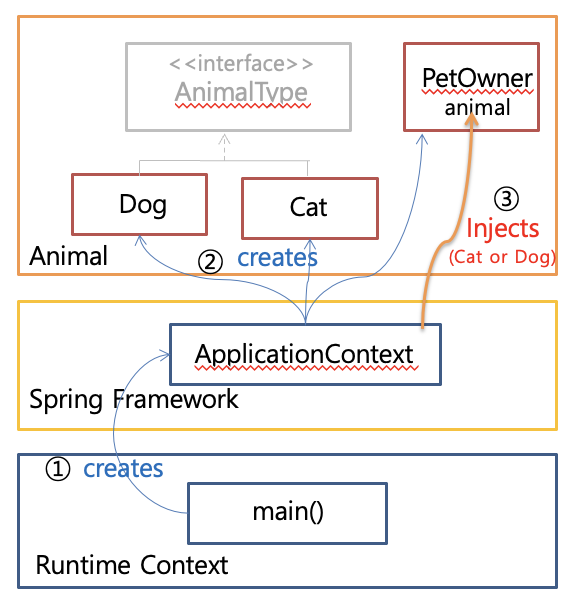
앞선 문제점은 DI를 통해 해결할 수 있다.
 DI
DI
따라서 코드는 다음과 같이 변화할 수 있다.
class PetOwner{
    private AnimalType animal;

    public PetOwner(AnimalType animal) {
    	this.animal = animal
    }
}
따라서 의존성 주입(DI)는 객체가 자신의 의존성을 직접 처리하는 것이 아니라, 프레임워크에 의해 의존성이 주입되는 디자인 패턴이다. 이 패턴은 프레임워크에 의해 동적으로 주입되기 때문에 여러 객체 간의 결합도를 줄여준다.
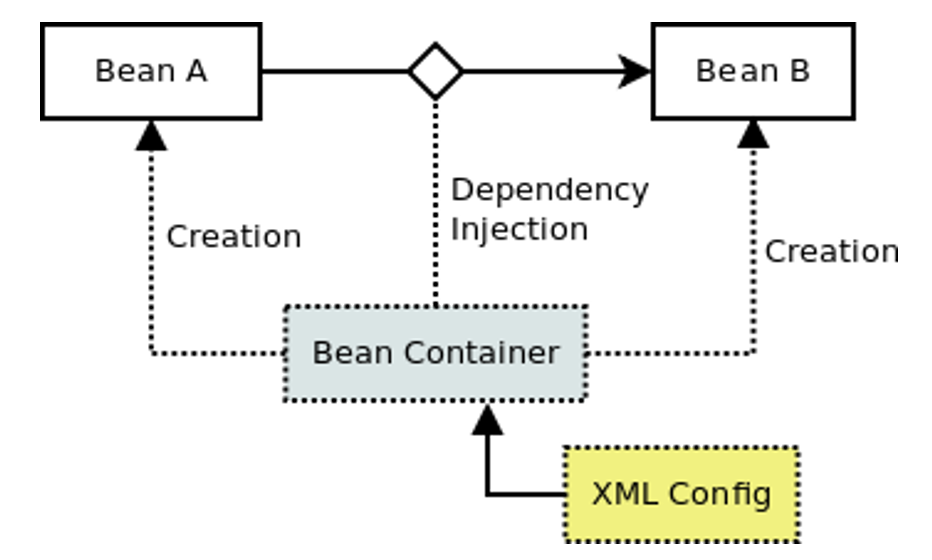
스프링 프레임워크의 코어 컴포넌트로 객체 생성 관리, 객체 의존성 주입의 주요 기능을 갖고 있다.
Spring Container의 구성하는 방법 세 가지
Spring Container의 종류 두 가지
| BeanFactory | ApplicationContext |
|---|---|
| 매우 간단, 주로 DI를 위함 | 더 확장, 고급 기능 제공 |
| 리소스가 제한된 경우 사용 (모바일...) | 아래 특징을 가진 어느곳애서든 사용 1. 엔터프라이즈 인식 기능 2. 애플리케이션 이벤트를 리스너에 게시 3. 요청 시 빈을 연결하고 폐기 |
| org.springframework.beans.factory.BeanFactory | org.springframework.context.ApplicationContext |
| XMLBeanFactory | ClassPathXmlApplicationContext |
 Spring Container and DI
| Key | 역할 |
|---|---|
| class (required) | 클래스 네임 구분 |
| id | bean을 구분하는 식별자 |
| scope | 객체의 범위 (singletone, prototype) |
| constructor-arg | 객체 생성 시 넘겨줄 매개변수 |
| property | 생성 시 setter에 넘겨줄 매개변수 |
| init, destory | 함수 |
public class Boy {
    private String name;
    private int age;

    @Required
    public void setName(String name){
        this.name = name;
    }
    ...
}<bean id=“boy” class=“Boy”>
<property name=“name” value=“Rony”/>
<property name=“age” value=“10”/>
</bean>
public class College {
    private Boy student;

    public void setStudent(Boy aboy){
        this.stuendt = aboy;
    }
}<bean id=“college” class=“College”>
<property name=“student” ref=“boy”/>
</bean>public class College {
@Autowired
private Boy student;
// public void setStudent(Boy aboy){
// this.stuendt = aboy;
// }
}<bean id=“college” class=“College”>
<!-- <property name=“student” ref=“boy”/> -->
</bean>@Autowired가 타입 모호성을 가질 때 사용
public class College {
    @Autowired
    @Qualifier(value=“tony”)
    private Boy student;
    ...
}<bean id=“boy1” class=“Boy”>
<qualifier value=“rony”/>
<property name=“name” value=“Rony”/>
<property name=“age” value=“10”/>
</bean>
<bean id=“boy2” class=“Boy”>
<qualifier value=“tony”/>
<property name=“name” value
다만 작동 방식은 동일함
public class College {
    @Resource(name=“boy1”)
    private Boy student;
    ...
}